1.Handling and Installation
 CAUTIONS (For Safe operation)
- Always wear (proper clothing and protective equipment (safety goggles and proper shoes) appropriate to the job.
- Pay attention to safety of work crew and surrounding workers.
- Follow the related labor safety regulations, 1-1-General Provisions (Prevention of risk with prime mover and rotary shaft) in the ”II. Ordinance on Industrial Safety and Hygiene”
- Before starting the work, make sure to turn power off, and avoid accidental power-on. Also, be careful that clothing or part of body is not caught by a chain, sprocket, or peripheral equipment during work.
- Clean work area, and work in safe environment.
- Do not stand or walk under lifting equipment.
- Before transferring a chain, be sure to secure it firmly.
Adjusting Chain Length (Number of links)
 1. To shorten a chain to an appropriate length, use a proper jig and employ a method appropriate to the structure of a chain.
It is recommended to use the exclusive jigs.- To shorten a riveted chain, grind away riveted ends of a part of rivets in the same line (on the same side).
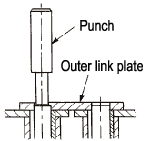 Place a punch at ground end of a rivet and strike a punch with a hammer.
Be careful to hit two pins alternatively. If pin is withdrawn without grinding off riveted end, a chain will be damaged. Grind away riveted ends.- After withdrawing pins, check to see if bushings are set correctly. If bushings are protruded, smooth power transmission cannot be achieved or strength of a chain is reduced.
- Do not reuse the removed parts.
Connection (Installation to Equipment)
- Confirm that sprocket shafts are parallel and level and misalignment of sprockets is within tolerance.
- Insert a connecting link between both ends (inner links) of a chain. In this case, this connector can be easily made when a chain is engaged with sprockets.
- When inserting a connecting link it is important that split pin hole or clip groove is exposed over a connecting link.
- Install a split pin or clip.
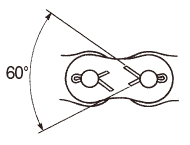
- Open ends of split pin at 60°as shown.
- Install a clip in direction opposite to chain advancing.
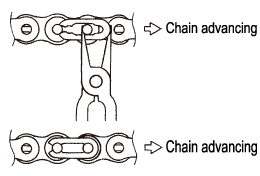
- Use genuine split pin or clip.
- Note that connecting link will be disengaged in case of improper installation. It may causes injury to people or equipment damage.
Proper Slack
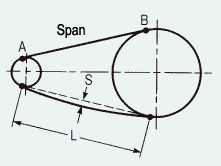
Proper slack “S” is determined by the following equation. Adjust shaft-to-shaft distance to set proper slack"S".
S=0.02L
Where, L is span
In the following cases, determine slack “S” by the equation of S≦0.01L.
- Vertical arrangement
- Upper side of chain is slackened.
- Shaft-to-shaft distance exceeds 50 times pitch.
- Vibration or impact is present.
- Chain starts and stops frequently.
- Forward/reverse movements are repeated frequently.
- Speed change ratio exceeds 7:1.
Proper shaft-to-shaft distance is 30 to 50 times pitch.
 CAUTIONS (Remanufacturing and additional manufacturing are prohibited.)
- Remanufacturing and additional manufacturing of chain and related parts are prohibited.
Otherwise, this will lead to dangerous severe accident. If remanufacturing or additional manufacturing is necessary, contact us. - Electric plating will lead to brittle breakage.
- Welding of heat-treated chain will cause cracks or sacrifice strength.
- Annealing of heat-treated chain will reduce strength of part.
- Enlargement of connecting link hole and reductions in connecting pin diameter will reduce strength.
2. Operation
Check Items before Operation
- Before operation, check if the following items are correctly set and safety cover is installed.
- If abnormal noise is caused during operation, immediately stop operation, and find cause of trouble and remedy.
| Description of Check | |
|---|---|
| Engagement | Check if sprocket is engaged correctly and slack is proper. |
| Link connection | Check if links are connected correctly and parts are firmly seated. |
| Interference | Check if there is any part or equipment that interferes with chain or any part that will be shattered. |
| Lubricant | Check if lubrication is proper. |
| Safety cover | Check if proper safety cover is installed. |
| Peripheral equipment | Check if peripheral equipment is properly installed. |
Lubrication
Roller chain lubricated with oil or grease will splash at the start of operation. Be sure to avoid splashing of lubricant on clothing and skin.
Insufficient lubrication of chain will promote wear of pins and bushings due to dry friction.
This will result in elongation and bending of chain and poor performance of chain.
To ensure service life of chain, choose the right lubricant and lubrication method to meet operating requirements.
For correct chain selection when no lubrication is allowed, contact us or our dealer.
Lubricating Points:
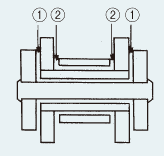
- Clearances between inner and outer links(To avoid elongation of chain)
- Clearances between rollers and inner links(To reduce wear of bushings and rollers, to avoid their breakage and to suppress noise)
3.Inspection and Maintenance
Inspection and maintenance are required to avoid trouble and keep power transmission ability.
Inspection Items and Measures to Trouble
| Inspection Items | Measures to Troubles |
|---|---|
| Harmful flaw or rust | Harmful flow or rust will reduce strength. Early replacement is recommended. |
| Slack of chain | Adjust shaft-to-shaft distance, if slack is improper. If it is found by measuring of elongation, that service life of chain is expired, change chain. |
| Rotation of pin (incorrect caulking position rather than initial caulking position) |
Possible cause is operation under over-load. Review operating conditions. Do not use any chain with a bet pin. |
| Uneven wear of roller | Possible cause is poor rotation of rollers. Find cause of trouble. Change the chain. |
| Insufficient movement of chain | Review power transmission conditions and lubrication method. Change the chain. |
| Lubrication of chain | Lubricate by correct lubrication method. |
Elongation Measuring Method and Chain Replacement Timing
 Measuring Chain Elongation
Use slide calipers to measure distance.

Measure distance.

- Measure distances L1 and L2 with chain lightly loaded.
- Measure distance over 6 to 10 links to reduce measuring errors.
- Elongation of chain is determined by the following equation.

 Chain Replacement Timing
Guideline of chain replacement, based on elongation of chain, is listed below.
| Number of larger sprocket teeth | 60 or lower | 61 to 80 | 81 to 100 | 101 or more |
|---|---|---|---|---|
| Elongation (%) | 1.5 | 1.2 | 1.0 | 0.8 |
- Listed data is applicable when take-up is possible, or when equipped with tensioner or idler.
- When shaft-to-shaft distance is fixed, guideline for elongation is 0.5% to 0.7%.
- When changing a chain, inspect sprockets.
Worn-out sprocket will adversely affect chain performance.
Note that service life of chains varies depending on number sprocket teeth, lubrication, operating environment, and other conditions, even though they are the same dimensions and type.
 CAUTIONS
- Do not replace the damaged parts of a chain with new ones. In this case, change the whole chain. Also, do not install any used connecting link and parts to a new chain.
- Do not adhere acid or alkaline liquid and highly volatile solvent to chain and sprockets, and do not use them for cleaning. If acid or alkaline liquid is accidentally adhered to chain, replace a chain with a new one. Adherence of acid or alkaline liquid will lead to brittle breakage. Use kerosene for cleaning. After cleaning, dry kerosene and apply lubricant sufficiently.


